
Adding an additional IP address on a Windows machine can be confusing at first, but is a very straightforward process.
Before you begin:
**Please note: You must be logged in as an Administrator or as a user with administrative privileges.**
Make sure the IPs you wish to add are enabled in your myCP. You can check this by clicking on the link that looks like this in your myCP:
Be sure that each IP you wish to add is set to “Enabled”. If not, then even if you add it correctly you will be unable to use it.
You will also need to know the following information:
The IP or IPs you wish to add, and the Subnet masks for each one. If you do not know this, feel free to open a support ticket asking for the relevant information.
Windows 2008
Quick Instructions
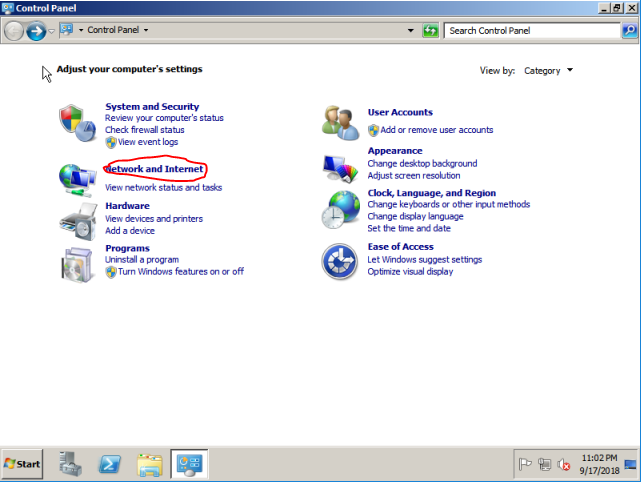
1. Open your Start menu and select the Control Panel option.
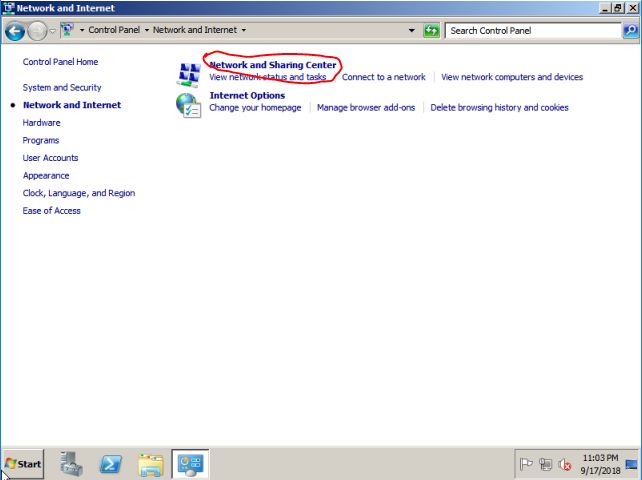
2. Open your Network and Sharing Center.
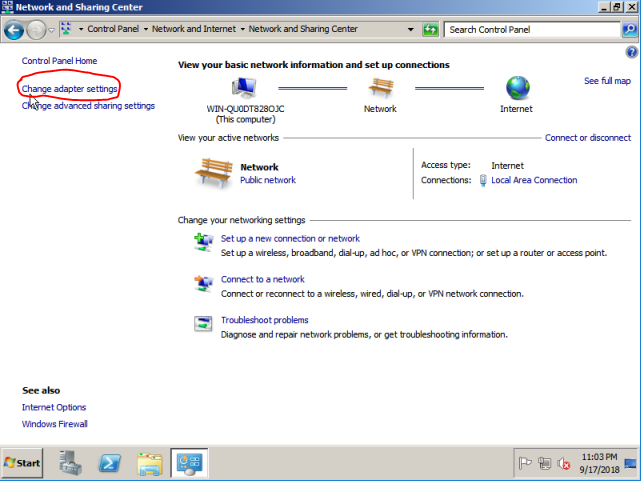
3. Select Manage network connections from the left sidebar.
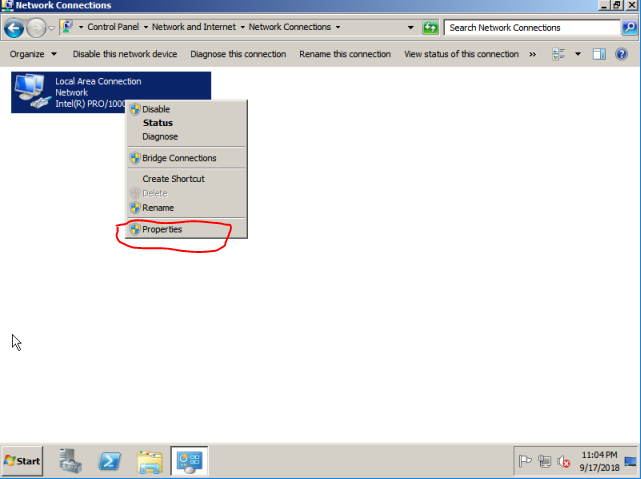
4. Right-click on the Local Area Connection you want to add an IP to.
5. Select Properties from the right-click menu.
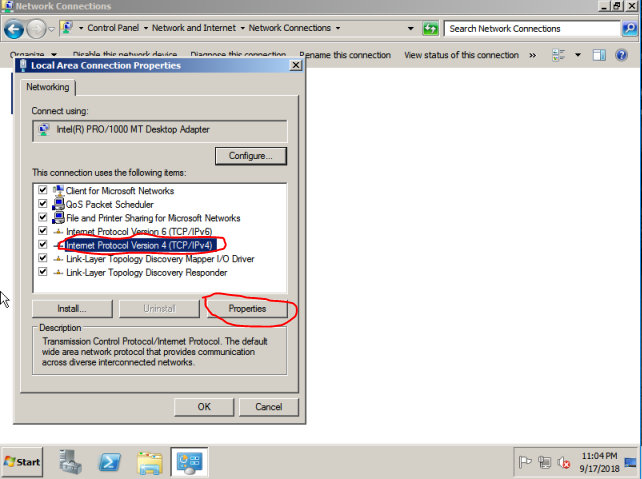
6. Select Internet Protocol Version 4 (TCP/IPv4) and click the Properties button.
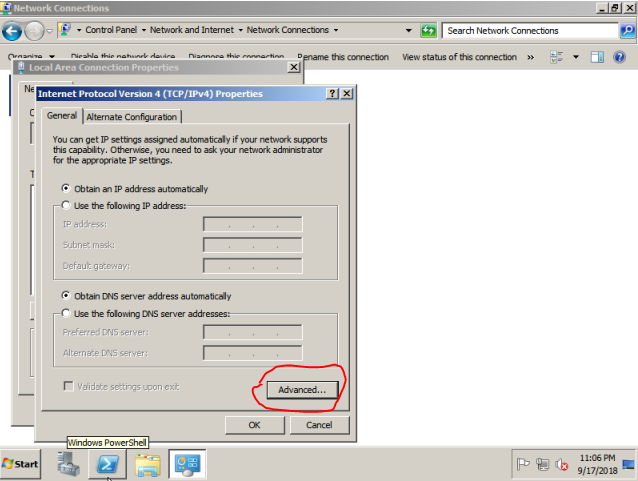
7. Click the Advanced… button.
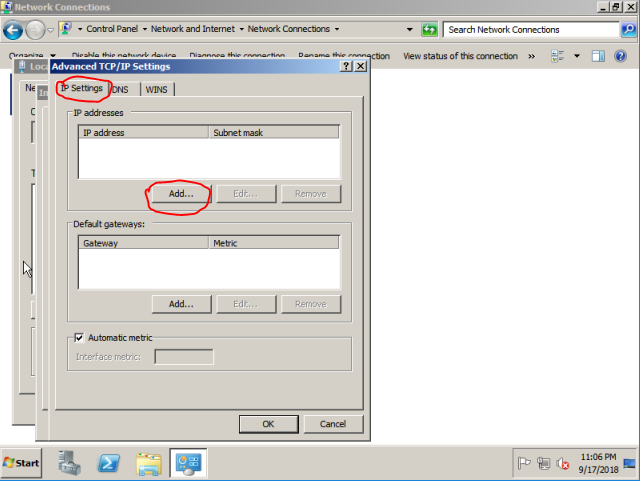
8. Click the Add…button under the IP addresses section.
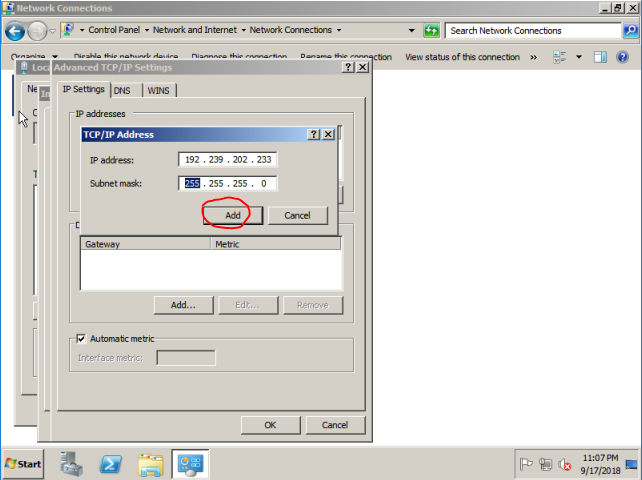
9. Enter the new IP and its Subnet information and click Add.
10. Close out of the menus and you’re finished!
In-depth Instructions
Step 1. Locating your Network Connections window.
The most reliable way is to first click on your Start Button or menu, then click on the Control Panel option.

From there you will need to select your Network and Sharing Center icon.
Finally, you will need to select Manage work connections from the left sidebar. This will open your Network Connections window.
Step 2a. Determine the correct Interface to configure.
Your server may show all but one of the Local Area Connection icons as “unplugged”. If this is the case then we do not have to go any farther to determine which Network Interface we need to configure and you should proceed to Step 2b. If not, please continue reading.
Depending on how your system detected its Network Interface Cards, you may need to do this for the icon labeled Local Area Connection, or Local Area Connection 2, or possibly another number.
To determine which one you will need to be configuring you will need to right-click on one of the Local Area Connections and select Properties from the right-click menu.
From there select Internet Protocol Version 4 (TCP/IPv4) and click on the Properties button. This will bring up the Internet Protocol Version 4 (TCP/IPv4) Properties window.
If this window shows the settings for your server’s Primary IP address then move onto Step 3. If not, then click Cancel and check the properties of a different Local Area Connection.
Step 2b. Accessing the Interface TCP/IP Properties.
If you already know which interface or Network Area Connection is correct, you will need to bring up the Internet Protocol Version 4 (TCP/IPv4) Properties window.
To do this, right-click on the correct Local Area Connection and select Properties from the right-click menu.
From there select Internet Protocol Version 4 (TCP/IPv4) and click on the Properties button. This will bring up the Internet Protocol Version 4 (TCP/IPv4) Properties window.
Step 3. Opening the Advanced TCP/IP Settings window.
You should all ready have the Internet Protocol Version 4 (TCP/IPv4) Properties window open. You will need to click on the button marked “Advanced…” at the bottom left of this window. This will bring up the advanced configuration window where you can add additional IPs.
Step 4. Adding Additional IPs.
From the Advanced TCP/IP Settings window, make sure you are in the IP Settings tab. Then, click on the “Add…” button under the “IP addresses” section.
This will bring up the TCP/IP Address window. Input your IP information and its Subnet mask and click “Add”.
If you have additional IPs to add, then continue to click the “Add…” button and fill out the information for them.
When you are finished adding your IPs, select OK to close each window, and finally select Close to close out of the Local Area Connection Properties window.
Step 5. Testing your work.
Click on your Start Button or menu and select “Run…”. In the dialogue box type “cmd” and click “OK”.
When the command prompt window appears, type:
ping x.x.x.x
For example if we added the IP “192.168.0.1”:
ping 192.168.0.1
You should see a responses saying something similar to the following:
Pinging 192.168.0.1 with 32 bytes of data:
Reply from 192.168.0.1: bytes=32 time<1ms TTL=128
Reply from 192.168.0.1: bytes=32 time<1ms TTL=128
Reply from 192.168.0.1: bytes=32 time<1ms TTL=128
Reply from 192.168.0.1: bytes=32 time<1ms TTL=128
Ping statistics for 192.168.0.1:
Packets: Sent = 4, Received = 4, Lost = 0 (0% loss),
Approximate round trip times in Milli-seconds:
Minimum = 0ms, Maximum = 0ms, Average = 0ms
If you get a response stating that the “Request timed out.” you may have made a mistake somewhere, or have not completed each step.
**If you are still experiencing issues please check out the troubleshooting section at the bottom. If you cannot find an answer there, feel free to open a support ticket and we will be happy to assist you.**
Troubleshooting and Tips
1. Be sure that you have enabled the IP correctly from your myCP. If it is still disabled then adding the IP to your server will not work correctly.